Switching on the
Autoloader
- Internal autoloaders: Switch on
the computer to switch on the autoloader.
- External autoloaders: Switch on
the autoloader using the power switch on
the rear panel by pressing the side with
the I symbol down, and then switch on the
computer.
Note: The diagram below shows an HP
SureStore DAT24x6e autoloader. The rear view of the
HP SureStore DAT40x6e autoloader is slightly different. ![[AUTOLOADER POWER SWITCH LOCATION]](images/autobk_1.gif)
Wait for the autoloader to complete its
self-test routine, during which the front panel
lights flash and the display shows the message Self
Test. The HP SureStore DAT40x6 autoloader alternates this
display with its serial number.
After a successful self-test, the lights stop
go out and the autoloader displays the message Insert
Mag if there is no magazine loaded. If there
is a magazine loaded, the message will say Mag
Loaded and the green Magazine Present light
(top) will be lit steadily.
If There Are
Problems During the Self-Test
![[AUTOLOADER DISPLAY SHOWING 'FRU 2 DEAD' ERROR]](../images/dispfru2.gif)
If the Operator Attention Required light
(bottom) shows steady amber at the end of the
self-test, this indicates a fault condition:
- If you have just installed the drive,
check the installation for loose
connections and repeat the self-test.
- Try the troubleshooting
procedures or run TapeAssure to
determine what the problem is.
- If the fault condition persists, write
down the message displayed on the front
panel and call for service.
Power-Cycling
To ensure reliable operation, do not switch
off power to the autoloader while it is reading,
writing, fast-searching, loading or unloading.
If the cartridge has just been unloaded from
the drive (but has not been returned to the
magazine) when the autoloader is switched off,
the cartridge will be taken into the drive and
threaded when the drive is next powered up.
Loading a Magazine and
Cartridges
The autoloader is configured to use DDS Media
Recognition System cartridges. Any other
cartridge will be treated as write-protected; you
will only be able to read it, not write to it.
See Choosing Cartridges
for advice on which cartridges to use with your
autoloader.
In order to maximize
drive and media reliability, we recommend that
you normally use the autoloader to provide one
week's backup per magazine. Ideally, use five
cartridges and one cleaning cartridge in
each magazine (DDS-3 cartridges with HP SureStore
DAT24x6 autoloaders and DDS-4 cartridges with HP SureStore
DAT40x6 autoloaders).
This allows you to perform a full
backup, up to 40 GBytes for DAT40x6 models and 24 GBytes for DAT24x6 models, each working day, and
ensures that the tape heads are cleaned once a
week.
Note: For
best performance and error-free operation, it is
advisable to use only one brand and type (tape
length) of data cartridge in a magazine. Ideally,
use only HP's DDS-4 or DDS-3 cartridges. Do not mix
DDS-1 (90m) with DDS-2 (120m), DDS-3
(125m) or DDS-4 (150 meter) cartridges. It is perfectly acceptable to
include a cleaning cartridge in a magazine.
- Place the required number of cartridges
in the magazine so that they point
towards the center of the magazine. You
can use any number of cartridges from 1
to 6, and can place the cartridges in any
of the magazine slots. However,for ease and
speed of use, start by using slot 1.
During a stacker mode
backup, the drive will attempt to load
the first cartridge from slot 1.
![[LOADING CATRIDGES INTO THE MAGAZINE]](images/al_magz1.gif)
- Insert the magazine through the door in
the front of the autoloader. Make sure
that the large arrow is uppermost and
pointing towards the autoloader, as shown
below.
![[INSERTING MAGAZINE INTO AUTOLOADER]](images/al_magz.gif)
- Apply steady pressure until the mechanism
takes the magazine and pulls it into the
autoloader. The autoloader will then
check which magazine slots contain
cartridges.
- When the magazine check is complete, use
either your backup software on the host
computer or the autoloader's front panel
buttons to select and load a cartridge
from the magazine into the drive.
The drive now performs a load sequence. This
takes a maximum of 25 seconds from the time the
cartridge is inserted to the time the drive is
ready to start acting upon the next command from
the host. The sequence is as follows:
- The drive mechanism threads the tape and
checks the tape format (DDS or audio). If
the tape is blank, the drive leaves the
tape at BOT (Beginning of Tape) and
awaits the next command.
- If the tape is in DDS format and is
write-enabled, the drive performs write
and read tests. If the error rate is
high, the Operator Attention Required
light illuminates and an error message
may appear on the front panel display.
- The drive reads the tape log, which
contains details of the history of the
tape.
- The drive rewinds to BOP (Beginning of
Partition) and goes online, awaiting a
command from the host.
Depending on whether the host computer
instructed the autoloader to load a cartridge or
you pressed the Load Cartridge button, the
autoloader goes into one of two modes of
operation: random mode, where movement of
cartridges is controlled by the backup software,
or stacker mode, where cartridges are loaded in
numerical order from the magazine. For more
information, see Autoloader
Modes of Operation.
Ejecting the Magazine
To eject a magazine, press the Eject button.
![[AUTOLOADER FRONT PANEL SHOWING EJECT BUTTON]](../images/al_eject.gif)
The autoloader ejects the magazine. However,
if one of the cartridges is still in the drive
mechanism when you press the Eject button, the
autoloader performs the following sequence of
actions first:
- The drive rewinds the tape and updates
the tape log (unless the cartridge is
write-protected). It then ejects the
cartridge from the drive mechanism.
- The changer mechanism replaces the
cartridge in the magazine.
- The magazine is ejected.
Note: It
is possible for the host computer to disable the
Eject button by sending a PREVENT MEDIA
REMOVAL command via SCSI. This will remain
in force until either the host sends an ALLOW
MEDIA REMOVAL command or the autoloader is
reset or power-cycled.
Forcing Ejection
If you press the Eject button when the
autoloader is busy, it may be a long time before
the autoloader will respond to the request
because it will finish the task it is performing
first. This ensures that the task is terminated
in a controlled manner and no data is lost.
However, if you need to unload a cartridge
urgently, even at the risk of losing data, you
must force ejection.
Caution: You
can lose data if you force ejection. The tape may
also end up invalidly formatted because an EOD
(End of Data) mark might not be written. Force
ejection only as a last resort to recover a
cartridge.
To force ejection:
Hold the Eject button down for at least five
seconds or press the Eject button three times
within one minute. The autoloader responds as
follows:
- The front panel display will show
"Force Eject."
- The autoloader waits 35 seconds to give
the normal eject procedure a chance to
occur.
- Once this time has elapsed, if there is a
cartridge loaded in the drive it is
immediately unloaded, regardless of what
operation the drive was performing. The
cartridge is then returned to its slot in
the magazine, and the drive is reset as
though the power had been cycled.
Because the forced ejection may interrupt
any operation, it is possible that the
drive will not write an EOD (End of Data)
mark before the cartridge is ejected.
This will cause loss of data and leave
the cartridge with an invalid format.
- If no cartridge is loaded in the drive,
the autoloader assumes that you want to
eject the magazine. Following the
35-second pause, it does this. The
autoloader is then reset as though power
had been cycled.
Note: A forced ejection will abort any
SCSI operations that may be in progress on the
autoloader and overrides any SCSI PREVENT
MEDIA REMOVAL in effect.
Write-Protecting
Cartridges
If you want to protect the data on a cartridge
from being altered or overwritten, you can
write-protect the cartridge. To write-protect a
cartridge, slide the tab on the rear of the
cartridge so that the recognition hole is open,
as shown below.
![[WRITE PROTECTING A CARTRIDGE]](../images/wprotect.gif)
Caution: Write-protection
will not prevent a cartridge being erased by
bulk-erasure or degaussing.
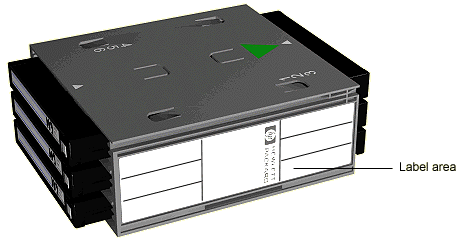
Labeling Cartridges and
Magazines
Ensure that no more than one label is stuck to
the label area of the cartridge. Use only labels
provided with cartridges. Never use non-standard
labels, and never stick anything to the cartridge
other than in the label area.
![[CARTRIDGE LABEL AREA]](images/caslabel.gif)
Make sure that the magazine label is stuck
firmly in the recessed label area on the side of
the magazine. If the label is stuck somewhere
other than in the label area, the magazine may
jam in the mechanism.
Ensure that the corners of cartridge and
magazine labels stick firmly to the surface and
do not curl at their edges.
![[HP SURESTORE DAT USER'S GUIDE]](images/btm_bnr.gif) ![[HOME]](images/home_ic.gif) ![[SEARCH]](images/cd_ic.gif) ![[HELP]](images/help_ic.gif) ![[BACK TO TOP]](images/top_ic.gif)
|
![[HP SURESTORE DAT USER'S GUIDE]](images/main_hdr.gif)