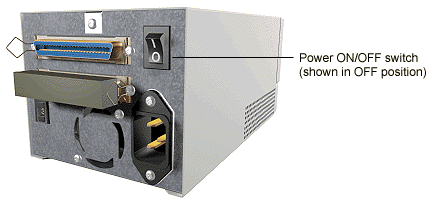
- Internal drives: Switch on the
computer to switch on the drive.
- External drives: Switch on the
drive using the power switch on the rear
panel by pressing the side with the I
symbol down, and then switch on the
computer.
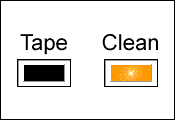
Wait for the tape drive to complete its
self-test routine, during which the Tape light
flashes. This should take about 5 seconds. When
the Tape light goes out, the drive is ready to
accept a DDS cartridge.
 |
If the Tape
light goes off but the Media Caution
light shows steady amber at the end of
the self-test, this indicates a fault
condition:
- If you have just installed the
drive, check the installation for
loose connections and repeat the
self-test.
- Try the troubleshooting
procedures or run TapeAssure
to determine what the problem is.
- If the fault condition persists,
call for service.
|
Loading and Unloading a
Cartridge
Use the correct type of cartridge for your
drive. Ensure that only one label is stuck to the
label area of the cartridge. Never use
non-standard labels, and never stick anything to
the cartridge other than in the label area.
To load a cartridge
![[CARTRIDGE LOADING ANIMATION]](../images/loading.gif) |
- Insert the cartridge into the
slot in front of the drive with
the label uppermost.
- Apply gentle pressure on the rear
of the cartridge until the drive
takes the cartridge and loads it.
|
| Do not try to
force the cartridge if it does not load
properly. The drive will eject the
cartridge after about 10 seconds so you
can load it again. When you insert a
cartridge, the drive performs a short
load sequence. This takes about 5
seconds, during which the Tape light
flashes green. When the load sequence is
finished, the Tape light shows steady
green.
HP SureStore DAT drives are configured
to detect DDS Media Recognition System
cartridges. Any cartridge that is not DDS
Media Recognition System will be treated
as write-protected. This means you will
only be able to read to a non-DDS
cartridge, not write to it.
To unload a cartridge:
![[CARTRIDGE UNLOADING ANIMATION]](../images/unload.gif) |
- Press the Unload button
on the front panel.
During the unload
sequence the Tape light
flashes green. The drive
completes any task it is
currently performing,
winds the tape to the
beginning and ejects the
cartridge. The sequence
can take up to 25 seconds
for a write-enabled
cartridge and 10 seconds
for a write-protected
cartridge. The sequence
may take longer if the
tape needs to be rewound
first.
- Remove the cartridge and
store it in its plastic
case.
|
|
|
If you want to protect the data on a cartridge
from being altered or overwritten, you can
write-protect the cartridge. To write-protect a
cartridge, slide the tab on the rear of the
cartridge so that the recognition hole is open,
as shown below.
![[UNPROTECTING AND PROTECTING A CARTRIDGE ANIMATION]](../images/wprotect.gif)
Caution:
Write-protection will not prevent a cartridge
being erased by bulk-erasure or degaussing.
If you press the Unload button when the drive
is busy, the drive may take some time to respond
because it will finish the task it is performing
first. This ensures that no data is lost.
On rare occasions, however, a system or
software fault may cause the tape drive not to
respond to an Unload request. In this situation,
you can force ejection. There are two ways of
doing this:
- Press the Unload button three times
within 5 minutes.
- Hold the Unload button down for at least
15 seconds.
Following either of these actions, the drive
waits until 35 seconds have passed from the time
of the first press, to give the normal eject
procedure a chance to proceed. After this period,
it immediately releases the tape and ejects the
cartridge, regardless of what operation it was
performing. The drive is then reset as though you
had turned the power off and then on again.
Caution:
You may lose data if you force ejection of a
cartridge. The tape may also become unreadable
because an EOD (End of Data) mark may not be
properly written.
 ![[HOME]](images/home_ic.gif) ![[SEARCH]](images/cd_ic.gif) ![[HELP]](images/help_ic.gif) ![[BACK TO TOP]](images/top_ic.gif)
|
