|
mail.phas.ubc.ca 142.103.236.13 (PUBLIC) - 192.168.1.13 (BACKUP) |
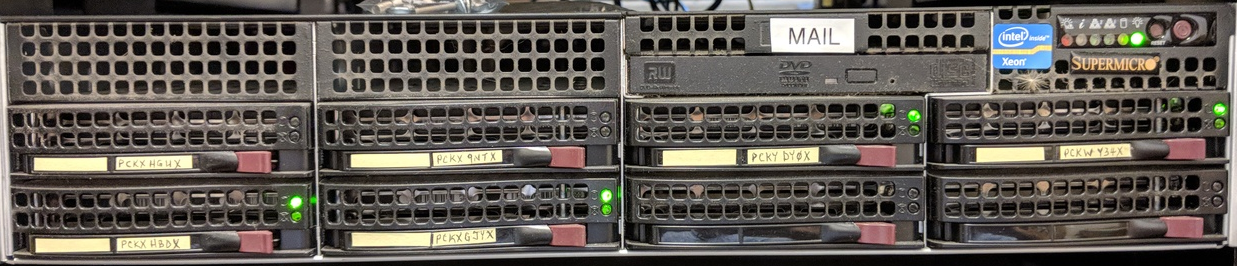
mail (currently located in Henn 110A) is a server running RHEL-7.
 --------------------------------------------------------------------------------------
|                     |                      |                                         |
                      -                      ------------------------------------------
|                     |                      |          DVD           |                |
 --------------------------------------------------------------------------------------
|                     |                      |                    |                    |
|      PCKXHGWX       |       PCKX9NTX       |      PCKYDY0X      |      PCKWY34X      |
|                     |                      |                    |                    |
 --------------------------------------------------------------------------------------
|                     |                      |                    |                    |
|      PCKXHBOX       |       PCKXGJYX       |      K4K4T1EB      |     K7GYTMAL       |
|                     |                      |      4 TB HGST     |     4 TB HGST      |
 --------------------------------------------------------------------------------------
DMARC records (that are published in a domain's DNS) are essential for email security. They prevent email spoofing by specifying how to handle emails failing SPF or DKIM checks. These TXT records define actions for unauthenticated emails and provide feedback on their domain's email authenticity, thereby reducing phishing risks and enhancing email deliverability.
The table below shows the commands used in Windows Command Line and Mac OS Terminal to query for the SPF, DKIM and DMARC records for a particular domain.
Follow the instructions below and substitute the words selector and domain with the corresponding DKIM selector and domain you would like to look up.
Example 1. Querying the SPF record for google.com using nslookup.
Example 2. Querying the DKIM key for ondmarc.com using dig. You will have to know the DKIM selector - "google" in our case - being used in order to query for the DKIM key.
Example 3. Querying the DMARC record for google.com using nslookup.
|
Record |
Windows Command Line |
Mac OS Terminal |
|
SPF |
nslookup -type=txt domain |
dig txt domain |
|
DKIM |
>nslookup >set q=txt >selector._domainkey.domain |
dig txt selector._domainkey.domain |
|
DMARC |
nslookup -type=txt _dmarc.domain |
dig txt _dmarc.domain |
1. installed updates via yum update.
2. ~8:40am rebooted computer
3. Would not reboot.  Drove to UBC and saw it had dropped into single user mode.
3. turned out /mail was not mounted.
4. manually mounted partition that I thought was /mail and restarted.
5. computer came up OK.
6. went to my computer and noticed that I did not have my proper mail - was very old.
7. stopped sendmail and dovecot - they had been running perhaps 15 mins.
8. Turns out I had mistakenly mounted an old mail backup partition.
8. found proper partition but it would not mount even though it did not show any errors:

[RH7-mail]# mdadm -Db /dev/md124
ARRAY /dev/md124 metadata=1.2 name=warp.phas.ubc.ca:mail UUID=61a80f0d:a50efd33:c5777cd2:80d41817

[RH7-mail]# mount /dev/md124 /mail
mount: /dev/md124: more filesystems detected. This should not happen,
       use -t  to explicitly specify the filesystem type or
       use wipefs(8) to clean up the device.

[RH7-mail]# file -s /dev/md124
/dev/md124: SGI XFS filesystem data (blksz 4096, inosz 256, v2 dirs)

RH7-mail]# xfs_repair /dev/md124
Phase 1 - find and verify superblock...
Phase 2 - using internal log
        - zero log...
        - scan filesystem freespace and inode maps...
        - found root inode chunk
Phase 3 - for each AG...
        - scan and clear agi unlinked lists...
        - process known inodes and perform inode discovery...
        - agno = 0
        - agno = 1
        - agno = 2
        - agno = 3
        - process newly discovered inodes...
Phase 4 - check for duplicate blocks...
        - setting up duplicate extent list...
        - check for inodes claiming duplicate blocks...
        - agno = 1
        - agno = 0
        - agno = 3
        - agno = 2
Phase 5 - rebuild AG headers and trees...
        - reset superblock...
Phase 6 - check inode connectivity...
        - resetting contents of realtime bitmap and summary inodes
        - traversing filesystem ...
        - traversal finished ...
        - moving disconnected inodes to lost+found ...
Phase 7 - verify and correct link counts...
done

[RH7-mail]# mount /dev/md124 /mail
mount: /dev/md124: more filesystems detected. This should not happen,
       use -t  to explicitly specify the filesystem type or
       use wipefs(8) to clean up the device.

[RH7-mail]# mount -t xfs /dev/md124 /mail

9. ~13:39pm This fixed things.  Restarted sendmail and dovecot.
10. Copied files from old mail backup partition to users inboxes.
11. Had to chown on all those files or people could not see email.
=========================================================================================================
cf: https://icesquare.com/wordpress/linuxdevsdb1-more-filesystems-detected-this-should-not-happen/

mount: /dev/sdb1: more filesystems detected. This should not happen,
       use -t  to explicitly specify the filesystem type or
       use wipefs(8) to clean up the device.

This message simply tells you that there are two or more file systems sitting in the hard drive partitions,
and the system does not know which one to use to mount. We can take a closer look to see what’s going on:

#sudo wipefs /dev/sdb1

offset               type
----------------------------------------------------------------
0x2d1b0fa8923        zfs_member   [raid]
                     LABEL: storage
                     UUID:  12661834248699203227

0x951                xfs   [filesystem]
                     UUID:  90295123-2395-7456-8521-9A1EE963ac53

As you can see, we have two file systems here. The easiest way is to wipe out the first few sectors of your disk, i.e.,

#sudo dd if=/dev/zero of=/dev/sdb bs=1M count=10

And we will re-do everything again, i.e.,
sudo parted /dev/sdb1
...
...
sudo mkfs.xfs /dev/sdb1
sudo mount /dev/sdb1 /mnt/
=========================================================================================================
xyz
For more assistance
contact sysadmin@phas.ubc.ca
( Sysadmin
)
| webmaster@phas.ubc.ca | [Dept. Home Page] | last updated: |